|
Call Today 800-627-1033 |
|
|
|
|
||
|
|
||


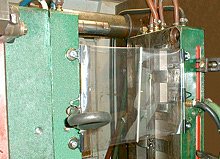
The Purpose of Mold ShieldsMold shields are crystal clear plastic curtains, which allow you to observe your molding area, and monitor your parts while production is in progress. As the mold opens and closes the Mold Shields are easily attached and removed as necessary, they can be quickly moved from press to press to meet changing production demands. Some benefits of Mold Shields:
If one of our standard size shields won't meet your needs, we will make them to any size you want. For vertical presses, where you might need to enclose 3 sides of your mold, we have special kits to meet your application. Magnet AssemblyEach mold shield contains:
*6 when required The hardware should be assembled to the magnet in the following sequence:
NOTE: Our Mold Shields are supplied with general purpose mounting hardware for instant assembly. This hardware is suitable for most installations, but may not be the best for your application. You may need to change or modify the hardware to optimize effectiveness in your particular application. Mold Shield InstallationStep 1 Assemble the mounting hardware kit. CAUTION: Do not permanently attach magnets to plastic clips Step 2 On each side of your mold, place two (2) assembled magnets in the appropriate locations on each mold half. Repeat on the other side. Take care not to trap any iron fillings or dirt between magnets and mold frame Step 3 Hook the Mold Shields to the magnets. Use at least one (1) set of fixed hooks on each side of each Mold Shield. Step 4 Before operating, open and close mold slowly. Make any adjustments to magent positions to ensure the Mold Shields are parallel and are not being crushed between obstructions. Step 5 Start normal operation.
Mold Shield Operating InstructionsThere is no need to remove Mold Shields to see into your mold. When you have a need to reach into your mold, un-hook one side of the Mold Shield and allow the Mold Shield to recoil slowly. If necessary, un-hook the second side and place the Mold Shield carefully in a safe location. When work inside your mold is complete, re-hook the Mold Shield and continue normal operation. If there is need to open your mold wider than the 24" (60cm) Mold Shield width, BE SURE to un-hook your Mold Shield first. Careful handling will prolong the life of your Mold Shields. Mold Shields must be protected from open flames, sharp objects and hot purgings. Spare parts and support may be obtained from: Services for Plastics, Inc.
Mold Shield Application NotesNote 1 Mold Shields should not be permanently attached to the magnets. The shield hooks should be easily removable. Note 2 Magnets should not be mounted on stripper plates. The jarring movement could cause the magnets to move. Place magnets on the next non-moving plate. This will require an extension from the magnet to the shield hook. Extensions can be made from 1/8" x 1" (0.3cm x 2.5cm) flat bar or a stiff wire. Smooth any sharp edges of the extensions prior to use to avoid cutting the shield. Note 3 Horizontal water lines, hydraulic lines, etc. present a challenge when installing Mold Shields. If there is a 1-1/4" (3.2cm) horizontal clearance between obstructions when the mold is closed, the Mold Shields may be installed. There are movable hooks on each side of the Mold Shield. Slide the movable hook to a place where it does not interfere with mold obstructions. You may need to fabricate extensions as mentioned in Note 2 if there is no way to place magnets in the desired location. Always use at least one fixed hook per shield side to ensure the shield does not creep downward. Note 4 Air blasts to assist molded parts drop can create a vortex condition which tends to pull the Mold Shield into the open mold providing the potential for catching the shield between mold frames at mold close. This is particularly true if the air is not stopped prior to mold close. Using a 1" (2.5cm) spacer between magnet top and shield hook will provide the opening the vortex needs to draw air without pulling Mold Shields into the danger zone. Note 5 There are installation conditions where mounting the magnets directly onto the platen is desirable. To do this, fabricate a 90º bracket. This should be long enough to have the Mold Shield edge at the desired location. WarningsSHARP OBJECTS such as knives or pins will puncture Mold Shields! OPEN FLAMES such as propane torches will destroy Mold Shields! RUBBING tie bars or other fixed objects will wear holes in Mold Shields! HOT PURGINGS will destroy Mold Shields! COMMENTS OR QUESTIONS: If you have comments or questions about Mold Shields, please contact
Services for Plastics, Inc.
Phone: 800-627-1033 Click here for more information on Mold Shields
|
![]()
Home | Request a Quote | Product Index | Online Catalog |
Barrels & Screws | Electrical Products | Hoses & Fittings |
Molding Accessories | SDS Sheets | Credit Application | Terms & Conditions | About Us | Contact Us
7925 N. Clinton St., Fort Wayne, IN 46825-3113, USA
E-mail: Sales@ServicesForPlastics.com
Contact Webmaster regarding content or link problems
Copyright 1997-2026 | Services For Plastics, Inc. | All rights reserved. | Privacy Policy